Tech Writer
If you’re planning to sell, recycle, or dispose of an old Mac, one of the most important steps is making sure all personal data is permanently removed. Simply deleting files or removing your user account is not enough. Without a proper drive wipe, sensitive information such as emails, passwords, photos, and documents can still be recovered.
At MacBook Repairs London, we regularly help customers across London prepare their Macs for resale or recycling. This guide explains, in simple terms, how to correctly wipe an old Mac before disposal, using Apple-approved methods that are safe and effective.
Why a Proper Drive Wipe Is Essential
Your Mac may contain:
- Personal photos and documents
- Saved passwords and browser data
- Email accounts and messages
- iCloud and Apple ID information
A full drive wipe ensures:
- Your data cannot be recovered
- The next owner can set up the Mac from scratch
- You avoid Apple ID or Activation Lock issues
This is especially important in the UK, where data protection and privacy are taken seriously.
Before You Start: Important Preparation
Before wiping the Mac, take a few minutes to prepare:
- Back up your data
Use Time Machine or an external drive if you need to keep anything.
- Sign out of iCloud
Go to System Settings → Apple ID → Sign Out.
This removes Activation Lock.
- Sign out of iMessage and iTunes / Music
This avoids account issues later.
Option 1: Wiping Apple Silicon Macs (M1, M2, M3)
If your Mac uses Apple silicon and is running macOS Sequoia or later, Apple has made this very easy.
Steps:
- Click the Apple menu
- Go to System Settings → General
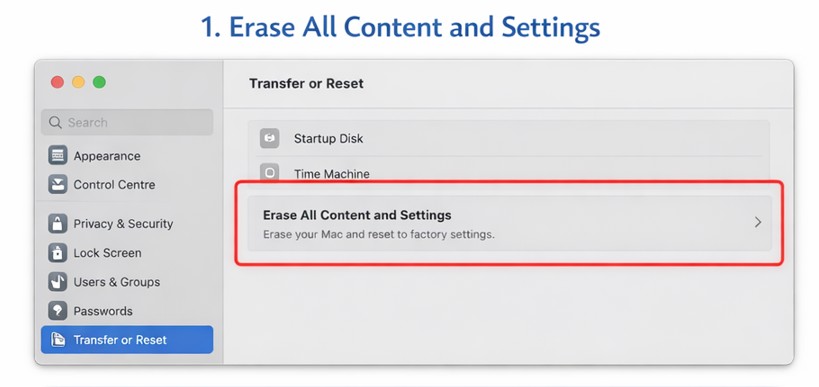
- Select Transfer or Reset
- Click Erase All Content and Settings
- Enter your password and confirm
This method:
- Securely wipes the internal drive
- Removes your Apple ID
- Reinstalls macOS automatically
This is the recommended method for newer Macs.

Option 2: Wiping Older Intel Macs (Most Common)
For older Intel-based Macs, you’ll need to use macOS Recovery.
Step 1: Start Recovery Mode
- Shut down the Mac
- Turn it on and immediately hold Command (⌘) + R
- Release when the Apple logo appears
Step 2: Erase the Internal Drive
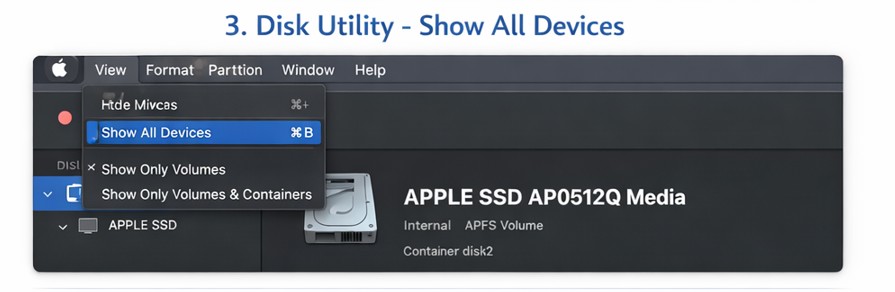
- In Recovery, open Disk Utility
- Click View → Show All Devices
- Select the top internal drive (not just “Macintosh HD”)
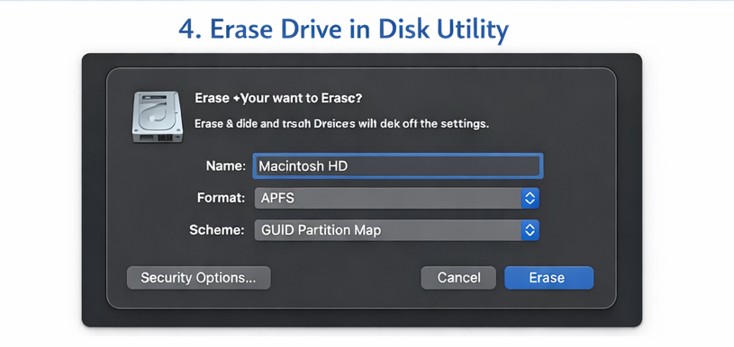
- Click Erase
Use these settings:
- Name: Macintosh HD
- Format: APFS (recommended)
- Scheme: GUID Partition Map
For extra security, click Security Options and choose a single-pass overwrite. This is more than sufficient for resale or recycling.

Step 3: Reinstall macOS
- Close Disk Utility
- Select Reinstall macOS
- Follow the on-screen steps
Once finished, the Mac will restart to the Hello / setup screen, ready for a new owner.
Common Mistakes to Avoid
- Deleting files instead of wiping the drive
- Forgetting to sign out of iCloud
- Leaving the Mac without macOS installed
- Selling a Mac still linked to your Apple ID (This one is major issue)
These mistakes can cause problems for both you and the next user.
When Professional Help Makes Sense
If your Mac:
- Won’t boot
- Has a failed SSD / showing folder sign
- Has liquid damage
- Is stuck on Activation Lock
A professional data wipe may be required. At MacBook Repairs London, we can securely erase drives, even on faulty machines, and prepare them safely for disposal.
Final Thoughts
A proper drive wipe protects your privacy and ensures your old Mac can be safely reused or recycled. Whether you’re upgrading or clearing out old equipment, taking the time to wipe your Mac correctly is always worth it.
If you’re unsure or need assistance, our London-based Mac technicians are happy to help.
Author 's Profile
B. Saeed
B. Saeed is a tech blog writer at MacBook Repairs London shares expert tips, guides, and repair insights to help MacBook users across London. With hands-on experience in Apple device troubleshooting and a passion for technology, she break down complex repairs into simple, useful advice. From battery replacements to logic board fixes, her goal is to keep your Mac running at its best while giving you practical knowledge along the way.